
GCA • Christmas parade workshop
Building on Christ.
Lighting the way.
A component-by-component guide to a Raptor-pulled celebration of our students, our faith and our new campus.
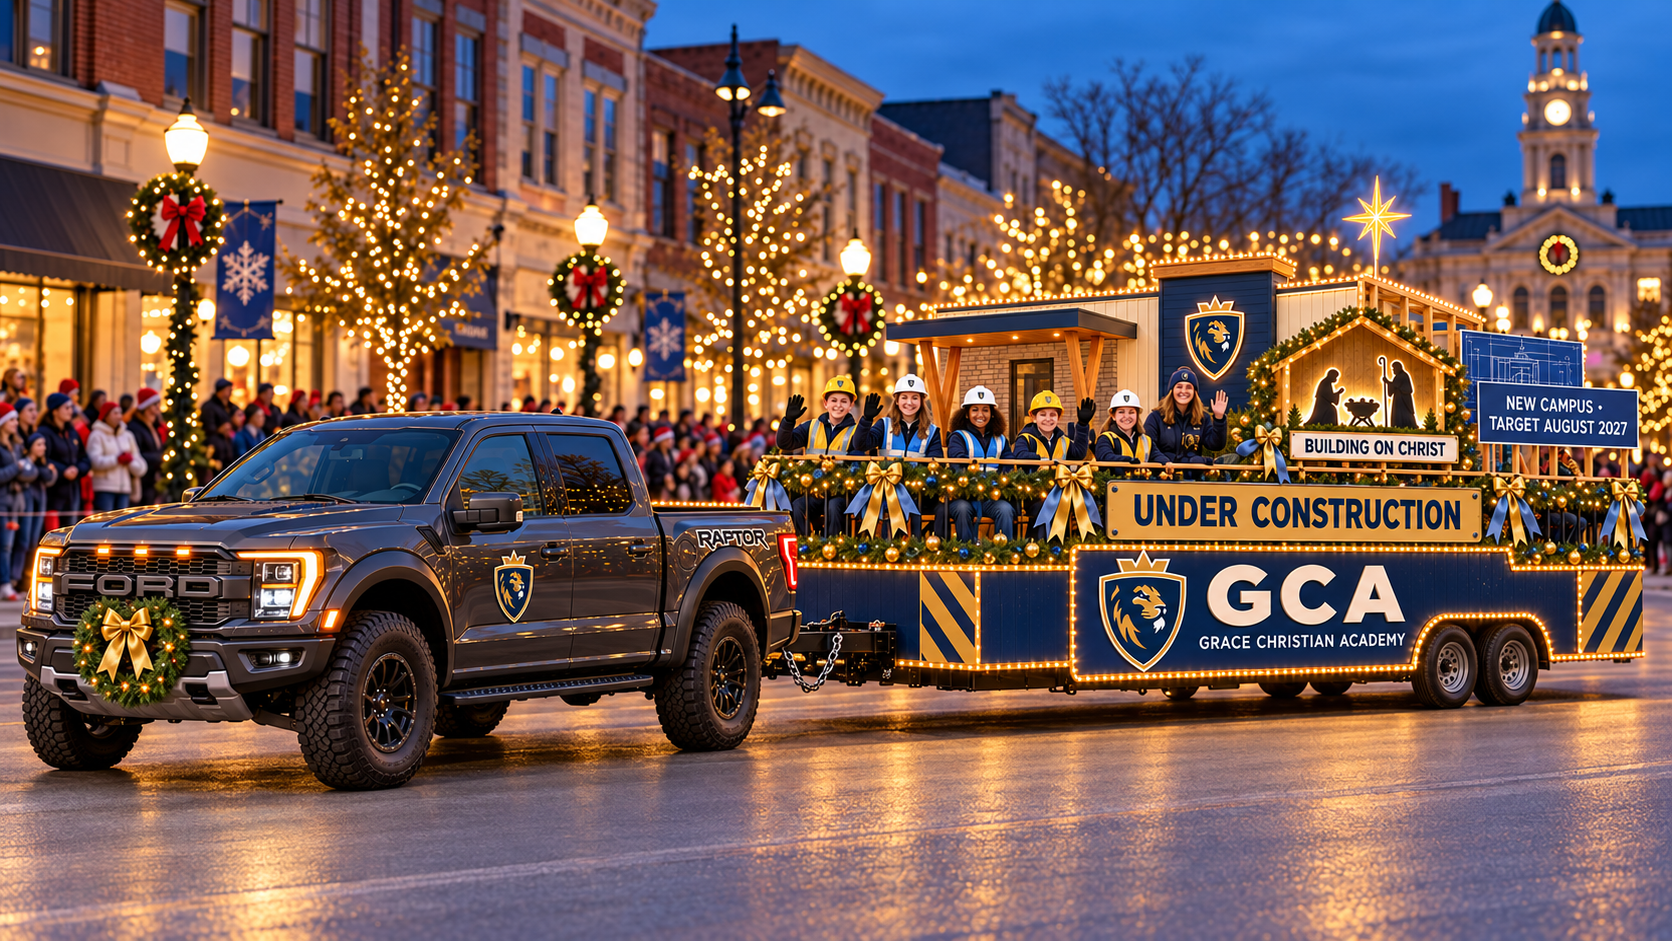
Make the decorations. Have the moving structure verified.
This guide covers nonstructural scenic work. A qualified towing, structural/rigging and electrical team must approve the actual equipment, attachments, riders, clearances and weather limits. No students in the active build area. No new purchases, bookings or parade entry are made by this guide.
01 / Plan before cutting
One story. Three visual layers.
Navy GCA branding at street level. Students celebrating learning in the middle. A small campus-inspired façade and Christmas nativity behind them—only where the approved layout permits.
Measure the real equipment
Record deck L × W, deck height, total permitted load, wheel/hitch zones, access and actual combined height. Blank dimensions are intentional. Stop if any rating or attachment is unknown.
Proof the school identity

Use the school’s original artwork, not the AI illustration’s interpretation. Navy #06193E · Gold #BAA263 · Blue #6181AF.
Keep the Christmas connection
The organizer’s listed theme is “The Sounds of Christmas.” Use Christmas-only music with the nativity and “Building on Christ” message. No additional Santa or Mrs. Claus character.
02 / Workshop field guide
Build it in nine manageable parts.
Open a component for materials, tools, sequence and its inspection gate. Decorative examples are scalable—not structural cut lists.
01Qualified setupRaptor + trailer
Start with the real rig, not the illustration.
Raptor + trailer
Start with the real rig, not the illustration.
Materials
- Actual Raptor towing label/manual, trailer identification and ratings
- Qualified towing/rigging reviewer; measured sketch and load inventory
- Rated equipment selected by the reviewer—not this guide
Tools / preparation
Tape measure, load/weight records, inspection checklist.
Scale note
No assumed trailer dimensions, passenger count or towing capacity.
Build sequence
- Park on level ground with the vehicle off and trailer secured by the qualified lead. Record usable deck length L, width W, deck height H, wheel/fender zones and approved access route.
- Have the towing lead verify the exact Raptor model’s tow/payload limits, receiver, coupler, chains, breakaway system, brakes, tires, lights and combined loaded weights. Include people, scenery, batteries and all supplies.
- Have the structural lead approve attachment locations, load distribution, rider protection and total height/width. Get organizer approval for riders and the actual tow vehicle/trailer.
- Mark a no-decoration envelope around hitch articulation, wheels, lights, brakes, exhaust and required access. Do not drill the truck or improvise trailer anchors.
Before this part is ready
Signed-off vehicle/trailer plan and load inventory before fabrication. If riders are not approved, build a display-only float and arrange an organizer-approved alternative.
02Decorative workshopNavy side panels
A clean navy base makes every gold detail read.
Navy side panels
A clean navy base makes every gold detail read.
Materials
- Exterior-suitable lightweight sign board or corrugated plastic approved for the use
- Navy finish #06193E, gold striping #BAA263, blue accents #6181AF
- Edge protection; attachment hardware specified by the structural lead
Tools / preparation
Tape, straightedge, pencil, appropriate cutting tool, eye protection; adult cutting team.
Scale note
Decorative samples only: 24 × 36-inch modules; trim to the approved measured layout.
Build sequence
- Measure each approved decorative zone after the rig plan is signed off. Make paper templates around wheel/fender and access openings; never cover required trailer lights.
- Divide long runs into manageable removable panels. A sample decorative module may be 24 × 36 inches, but final size follows the measured safe zone—not a structural design.
- Cut and deburr on a supported bench; round or cover sharp edges. Paint/finish navy and add a narrow gold perimeter. Cure to the manufacturer’s instructions.
- Dry-fit with the trailer stationary. The qualified lead installs approved restraints/attachments and verifies no panel can reach tires, pavement or hitch throughout movement.
Before this part is ready
Nothing drags, flaps, blocks a light or conceals an inspection point. Skirting is not a guardrail.
03Decorative workshopGCA lettering + number boards
Actual school artwork, generous contrast, no invented opening promise.
GCA lettering + number boards
Actual school artwork, generous contrast, no invented opening promise.
Materials
- Official crowned-lion artwork and approved GCA wordmark
- Exterior vinyl/printed graphics, navy sign blanks
- Two official entry-number boards, at least 18 × 18 inches each
Tools / preparation
Printer/sign-shop proof, paper templates, squeegee, level, removable positioning tape.
Scale note
Scale GCA lettering to the actual panel; official number boards ≥18 inches square.
Build sequence
- Use the official logo shown on this page; do not trace or recreate the AI image’s lion. Ask the school to approve the print proof.
- Lay out GCA large, with Grace Christian Academy beneath. Use gold/navy/white contrast; test legibility from across the room before printing.
- Make a separate “UNDER CONSTRUCTION” banner and “BUILDING ON CHRIST” message. For the campus caption use “OUR NEW CAMPUS” unless leadership approves specific future dates.
- Reserve an unobstructed official entry-number panel on each side, at least 18 inches square. Keep number boards distinct from decoration; fit the assigned numbers once received.
Before this part is ready
Correct lion, spelling and school-approved claims. Both entry numbers readable.
04Professional attachmentSmall scenic campus façade
A lightweight stage flat—not a building, roof or climbing frame.
Small scenic campus façade
A lightweight stage flat—not a building, roof or climbing frame.
Materials
- Current school-approved campus rendering
- Lightweight exterior scenic panels with printed or painted windows/brick
- Low-profile trim; support system designed by a qualified scenic/structural builder
Tools / preparation
Paper elevation, tape, painter’s tools; fabrication tools operated by adults.
Scale note
Height and width TBD after clearances and stability review. The 13-foot organizer limit is a ceiling, not a design target.
Build sequence
- Simplify the real campus rendering into three visual cues: navy entry tower, pale wall panels and a recognizable entrance. Do not invent a new campus design.
- Make a tabletop paper mockup first. Position the façade in the approved plan so it does not block supervision, access or the driver’s view.
- Paint windows/brick and apply the official lion to flat lightweight panels on the ground. Favor a flat scenic outline over a real projecting roof.
- Give the qualified builder the finished sizes and weights. They design supports and trailer attachments for motion and wind; no fastener schedule or bracing sizes are implied here.
Before this part is ready
Qualified approval of wind/loading/attachment and overall height. No climbing, standing on, entering or storing children behind scenery.
05Decorative / reviewed mountNativity silhouette + star
Keep Christ at the center, with a low-profile illuminated scene.
Nativity silhouette + star
Keep Christ at the center, with a low-profile illuminated scene.
Materials
- Simple school-approved nativity silhouette artwork
- Lightweight exterior display board and gold/white accents
- Outdoor-rated LED outline; no real candles or open flame
Tools / preparation
Paper template, adult cutting tools, sanding/edge finishing supplies.
Scale note
Suggested paper-mockup scale: one star about one-quarter of the backdrop width; final dimensions require review.
Build sequence
- Draw or print a simple Mary/Joseph/manger silhouette; use a flat backdrop rather than a raised live scene.
- Cut and smooth all edges in the adult workshop. Paint navy silhouettes against a pale or warm-white background so the shape reads at dusk.
- Make a lightweight star and dry-fit it within the approved façade height envelope. Keep it low-profile; do not add an unreviewed tall pole.
- Have the structural lead approve mounts and the electrical lead approve LED routing. Keep every display piece outside the rider/access space.
Before this part is ready
No open flame, sharp projections, unreviewed high mast or unsupported scenic roof.
06Decorative workshopGreenery, bows + truck accents
Repeat navy, gold and blue—not a heavy layer of loose ornaments.
Greenery, bows + truck accents
Repeat navy, gold and blue—not a heavy layer of loose ornaments.
Materials
- Outdoor-suitable artificial garland
- Navy, gold and blue ribbon; soft lightweight ornaments
- Manufacturer-approved non-damaging vehicle display mounting system
Tools / preparation
Scissors, measuring tape, soft ties for bench assembly; approved final restraints.
Scale note
Garland estimate = measured approved edge length; add only a modest cutting allowance after measurement.
Build sequence
- Measure approved display edges and assemble short garland sections on a table. Make matching three-color bows and secure ribbon tails so they cannot trail.
- Attach lightweight ornaments individually to the garland; remove hooks or sharp wire ends. Count and label each section for its location.
- Mount float garland only at locations approved by the rigging lead. Decorative ties do not replace engineered restraints or rider rails.
- For the Raptor, first check the vehicle manual and manufacturer-approved accessory methods. Do not block radiator airflow, sensors, cameras, headlights, plate or windshield; omit the concept’s grille wreath if clearance cannot be verified.
Before this part is ready
Shake/check every decorative section while stationary. No balloons released, dangling ribbon, loose glitter or falling ornaments.
07Electrical reviewLED lighting + Christmas sound
A warm glow with a verified power plan.
LED lighting + Christmas sound
A warm glow with a verified power plan.
Materials
- Outdoor-rated low-voltage LED strings; manufacturer-matched power supplies
- Protected battery/power system selected by electrical lead
- Christmas-only soundtrack and securely mounted modest-volume speaker
Tools / preparation
Manufacturer specifications, circuit/load worksheet, appropriate electrical test equipment used by qualified lead.
Scale note
No battery capacity, wire gauge or fuse size is specified without a measured load.
Build sequence
- Mark lighting zones: skirt outline, façade edge, nativity/star and greenery. Organizer wording asks/requires 1,000 lights; confirm the current packet and count LEDs, not guessed power demand.
- Record actual watts/amps for every string and audio device. The electrical lead sizes power, protection and runtime from manufacturer ratings and the total load; do not splice household wiring or exceed daisy-chain limits.
- Use outdoor-rated connectors and weather protection as specified. Secure cables away from feet, wheels, heat, pinch points and emergency access. Do not tap truck wiring or add an external generator.
- Run a full-duration stationary test under the lead’s supervision, including sound and lighting together. Recheck temperature, connections and battery retention; use only Christmas music and keep directions audible.
Before this part is ready
Qualified electrical sign-off, tested runtime, accessible approved extinguisher and reachable shutoff. No open flame or external generator.
08School + organizer approvalStudent construction costumes
The image is a mood reference—not an approved rider arrangement.
Student construction costumes
The image is a mood reference—not an approved rider arrangement.
Materials
- Existing GCA clothing and weather-appropriate layers
- Properly fitting decorative construction hats/vests
- Parent permission, school supervision and emergency/pickup plan kept privately
Tools / preparation
Private roster, costume-fit checklist, organizer-approved rider plan.
Scale note
Rider count remains TBD until trailer ratings, school policy and organizer approval are confirmed.
Build sequence
- Keep children away from the workshop, loading, rigging and electrical work. Adults complete the build before any student visit.
- The school and organizer must approve whether students may ride. A qualified builder must verify rider rails, seats/restraints, access and occupancy; the scenic side panels do not provide protection.
- Fit costumes without obscuring vision or creating loose straps. Use only soft decorative props; no real hand tools or shovels, climbing, standing on railings or staged construction work.
- Rehearse boarding and exit only while parked and secured with adults controlling access. Follow the approved rider position for the entire moving route; no boarding, dismounting or swapping riders in motion.
Before this part is ready
No child participates without permission and a named supervising adult. Establish reunification and weather cancellation procedures.
09All leads sign offFinal assembly + parade-day check
Build in modules. Inspect as one moving system.
Final assembly + parade-day check
Build in modules. Inspect as one moving system.
Materials
- Labeled modules and approved hardware
- Inspection sheets, repair kit, weather plan
- Accessible extinguisher selected/maintained for actual hazards
Tools / preparation
Qualified lead’s inspection tools; inventory and handoff sheets.
Scale note
Organizer-assigned arrival/start time must be confirmed; official pages currently conflict.
Build sequence
- Assemble in this order: inspected rig → approved support/rider system → scenic panels → graphics → restrained greenery → electrical/sound → inspection. Keep the hitch, access and emergency equipment visible.
- Measure the actual loaded overall height and width, including the star. Verify route overhead clearance and the published 13-foot height maximum with the organizer.
- Have the qualified team perform a controlled, child-free movement and turning test in an appropriate permitted area. Correct sway, loose parts, clearance or visibility problems before use.
- Before departure and after transport to staging, repeat the inspection. Load students only after approvals and final weather go/no-go. After the route, unload while stationary, isolate power, remove modules and inventory reusable pieces.
Before this part is ready
Any unresolved towing, load, attachment, rider, electrical, clearance or weather issue is a no-go—not a decorative punch-list item.
03 / Stage the work
Small teams. Clear handoffs.
Plan & approve
Event lead: organizer packet, entry and schedule.
Qualified leads: tow/load, structure, riders and power.
School lead: artwork, students and private permissions.
All named volunteers and approvals remain TBD.
Fabricate & decorate
Adult scenic team: measured templates, cutting, finishing and paint.
Graphics team: logo proof and number boards.
Décor team: bows/garland made off the trailer.
No student builders around tools, loading or energized equipment.
Inspect & operate
Qualified crew: attachments, power and controlled test.
Driver + spotters: organizer-approved route operations.
School chaperones: boarding, supervision and pickup.
One designated go/no-go lead; anyone can raise a safety concern.
Quantity worksheet—not an order
Measure first; obtain quotes and approval before purchasing. No budget or vendor availability is assumed.
- Panels: sum the measured decorative areas; divide by usable sheet area, then add a documented cutting allowance. Keep wheel/access cutouts on the plan.
- Paint / vinyl: use finished surface area and the product’s coverage instructions. Include test samples and curing time.
- Garland / ribbon: sum approved display-edge lengths; count bow locations after the mockup. No trailing ends.
- Lights: plan toward the organizer’s 1,000-light wording, subject to confirmation; total actual wattage and runtime are a separate electrical calculation.
- Graphics: two GCA side signs, approved message panel(s), official lion prints and two entry-number boards at least 18 inches square.
- Safety / mounting: quantities and specifications come from the qualified reviewers—not generic shopping substitutions.
04 / Ready means verified
Parade-day go / no-go.
These checkboxes are a personal, unsaved review aid—not shared approvals or proof of safety. Refreshing resets them. Record real sign-offs separately with the responsible leads.
No-go: unresolved ratings, unsafe rider arrangements, loose scenic pieces, electrical faults, inadequate clearance, missing required approval or unsafe weather. Reduce scope or do not run the float; do not improvise under parade-day pressure.
05 / Check the organizer’s current packet
Official requirements & open questions.
Date / timing
The official FAQ lists November 21, 2026. Published start times conflict (4 p.m. versus 4:30 p.m.). Confirm your assigned arrival and start time directly; do not plan from one conflicting page.
Organizer FAQ ↗Display / operating rules
Licensed, insured driver; accessible fire extinguisher; entry-number signs ≥18 inches square on both sides; Christmas music only; no smoking or extra Santa/Mrs. Claus. Do not throw anything. Only individually wrapped candy may be handed out, subject to the school’s approved adult handout plan.
Official rules ↗Confirm before build
FAQ lists a 13-foot maximum overall float height. Rules/application wording differs on 1,000 lights. Current pages do not specify engineered trailer/rider details. Confirm rider permission, dimensions, power and inspection requirements; application deadline text includes an older year.
Application / current packet ↗Sources reviewed November 2, 2026. This is an unlisted, noindex planning guide, not a private page. Do not enter student identities, contact details or permission documents here. Concept art is AI-generated; no engineering certification, purchase or booking is implied.